
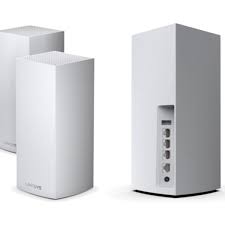
With its strong tri-band mesh Wi-Fi technology, the Linksys Velop MX8503 is built to give your home or office network outstanding performance and coverage. The Linksys Velop MX8503 Setup is a simple procedure, and this tutorial will take you through each step to make sure the installation goes easily.
Linksys Velop MX8503 Setup via wps method
The Linksys Velop MX8503 may be quickly and easily configured using the WPS (Wi-Fi Protected Setup) method. This is a condensed manual consisting of seven key points:
- Ascertain that your Velop MX8503 node is prepared and powered on. Keep your modem or router for Wi-Fi close by.
- Locate the WPS button on your modem or router. Usually, it has the word “WPS” written on it or an icon.
- Press and Hold the WPS Button: On your wireless router or modem, press and hold the WPS button. WPS pairing is started as a result.
- Press the Velop MX8503 node’s WPS button within two minutes. The node’s WPS LED ought to begin to blink.
- It may take a few minutes for the Velop node to connect to your modem or router over WiFi. The moment the connection is established, the LED will cease to blink.
- Verify that the Velop node is successfully linked to your Wi-Fi network once the LED stops blinking. You can use the Linksys app or the Velop dashboard to accomplish this.
- To expand your mesh network, repeat the steps for each additional Velop node you need to set up.
You may quickly and easily set up your Linksys Velop MX8503 utilizing the WPS technique with three easy steps, guaranteeing fast and dependable Wi-Fi connectivity throughout your area. so follw these simple Steps they can use home or office network outstanding performance and coveragehome
Linksys Velop MX8503 Setup via a web browser
Here is a quick six-point instruction to help you Linksys Velop MX8503 Setup utilizing the web-based method:
- Use Wi-Fi or an Ethernet connection to connect your computer or other device to the Velop MX8503 node.
- Open the linked device’s favorite web browser.
- Enter “192.168.1.1” or”extender.linksys.com”which is the standard IP address for Linksys routers, in the address bar and hit Enter.
- When prompted, provide the username and password for your router. Use the default credentials, which are often “admin” for both the username and password, if you haven’t changed them.
- Go to the setup or configuration area of the router’s web interface after logging in.
- To finish the setup procedure, which includes setting up Wi-Fi and generating a network name and password, adhere to the on-screen directions.
- You may effortlessly configure your Linksys Velop MX8503 through the web-based technique by following these instructions, which will guarantee uninterrupted network access for your home or office.
Linksys Velop MX8503 Setup common problems
A Linksys MX8503 Wi-Fi range extender’s installation can occasionally be difficult because of numerous aspects including placement, setup, and compatibility. Here are some typical issues that users could run into during Linksys Velop MX8503 setup and their fixes:
- Internet connection, but it is not working.
- Extender.Linksys.com not working
- Can’t connect to Linksys.Extender.com local
- Incorrect Extender.linksys.com password.
- Utilize your account details for logging in.
- Can’t access linksys.extender.com
- Issues while accessing the 192.168.1.1 IP address.
- WiFi connectivity issues.
- Netgear Genie smart setup page continues to appear even after the Linksys MX8503 Setup.
- Forgot the Linksys Extender default password?
- The extender’s LED lights are not stable.
- Extender.Linksys.com doesn’t open.
- I can’t log in to the Linksys MX8503 extender.
- MX8503 drops internet connectivity.
- MX8503 is not working after a failed update.
- No internet connection is present on the WiFi extender.
Troubleshooting Steps:
Consider the following troubleshooting if you have problems with the Linksys Velop MX8503 setup:
- Check to see if the wall socket is providing sufficient power for the Linksys velop MX8503 Extender.
- Ensure that the electrical outlet to which the extender is linked is working properly and is not experiencing a short circuit.
- Access verifies that your device has a strong internet connection.
- Verify all wiring connections. Any cables that are broken should not be used.
- If Extender.linksys.com isn’t working for you, check that you entered the correct URL into the address bar.
- Do a power cycle and then try configuring your Linksys extension once more.
upgrade Linksys Velop MX8503 firmware
Here’s a quick and simple seven-point approach to updating the firmware on your Linksys Velop MX8503:
- Launch the Linksys app on your tablet or smartphone.
- On the dashboard, tap the Velop MX8503 system.
- Look through the settings menu for the “Software Updates” or “Firmware Updates” option.
- To find out if a new firmware version is available, tap “Check for Updates”.
- Download the most recent firmware update by following the instructions if one is available.
- After downloading, select “Install” to start the firmware update procedure.
- Let the updating process finish. This is the period when the Velop MX8503 nodes might resume. You’ll be informed that the firmware update was successful once it’s complete.
You can quickly update the firmware on your Linksys Velop MX8503 to ensure optimal performance and security for your mesh Wi-Fi system by following these easy steps.
Reset Linksys Velop MX8503 process
Here is a quick instruction that will show you how to reset your Linksys Velop MX8503 in seven easy steps:
- Locate the reset button on the node of Velop MX8503. Usually, there’s a tiny pinhole with the word “Reset” on it.
- After making sure the node is powered on, disconnect the power adapter to turn it off.
- Using a paperclip or other similar instrument, carefully press and hold the reset button.
- For ten to fifteen seconds, hold down the reset button. The LED indications will begin to blink, signaling the commencement of the reset procedure.
- When the designated period of time has elapsed, release the button.
Conclusion
The Linksys Velop MX8503 setup concludes with seamless mesh networking, delivering robust Wi-Fi coverage throughout your home or office. With its advanced tri-band technology and intelligent mesh routing, the MX8503 ensures optimal performance and reliability for all connected devices. Enjoy high-speed internet, smooth streaming, and lag-free gaming experiences with the Linksys Velop MX8503.